Showing posts with label baby hat. Show all posts

Sunday, October 23, 2011

Turkey Hat

Gobble gobble! 

Materials:
Red Heart SuperSaver (100% acrylic), Brown
Red Heart SuperSaver (100% acrylic), Gold
Red Heart SuperSaver (100% acrylic), Black
Red Heart SuperSaver (100% acrylic), Cream 
Red Heart Soft (100% acrylic), Tangerine 
Lily Sugar 'n Cream (100% acrylic), Sage Green 
Bernat Berella (100% acrylic), Red 

Pattern:
Not yet written  :) 

Friday, October 21, 2011

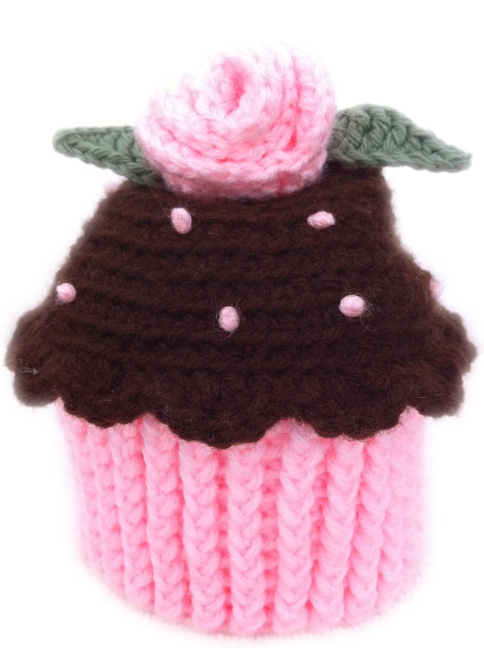
Cupcake Hat


This cupcake is my latest (and most delicious!) creation yet. 

Materials:
Red Heart SuperSaver (100% acrylic), Light Pink
Red Heart SuperSaver (100% acrylic), Brown
Lily Sugar 'n Cream (100% acrylic), Sage Green 

Pattern:
For the upper portion of the cupcake, I began with a simple newborn hat pattern using single crochet, alternating rounds of single crochet with increasing rounds. Once the top was large enough, I created the ruffled edge using a combination of SC, HDC, & DC stitches. 

The ribbed lower portion, representing the cupcake wrapper, was created entirely in DC, alternating front post & back post stitches. 

For the rose, I modified this rose pattern to create a smaller version of the flower and leaves. 

The sprinkles on the cupcake were actually the hardest part. To create those, I tied several knots on a long piece of yarn, then pulled the knots to the visible part of the hat while leaving the rest of the yarn visible on the underside. 

Wednesday, October 19, 2011

Jack Skellington baby hat


Materials:
Red Heart SuperSaver (100% acrylic), White
Red Heart SuperSaver (100% acrylic), Black

Body Pattern (in white):

To end each row, join last stitch to first stitch using a slip stitch.
To begin new row, chain 2 (does not count as first stitch).

Round 1: Using magic circle, make 10 DC in loop. Join last stitch to first stitch using slip. (10 stitches)
Round 2: Make 2 DC's in each stitch. (20 stitches)
Round 3: *2 DC's in first stitch, 1 DC in next stitch*, repeat for entire round. (30 stitches)
Round 4: *2 DC's in first stitch, 1 DC in next 2 stitches*, repeat for entire round. (40 stitches)
Round 5: *2 DC's in first stitch, 1 DC in next 3 stitches*, repeat for entire round. (50 stitches)
Round 6: *2 DC's in first stitch, 1 DC in next 4 stitches*, repeat for entire round. (60 stitches)
Rounds 7-16: DC in each stitch, repeat for entire round. (60 stitches)

Eye Pattern (in black, make 2):
Round 1: Using magic circle, make 6 single crochet (SC) in loop. Join last stitch to first stitch using slip. (6 stitches)
Round 2: Make 2 DC's in each stitch. (12 stitches)
Round 3: Make 2 SC's in each stitch. (24 stitches)
Round 4: *2 SC's in first stitch, 1 SC in next stitch*, repeat for entire round. (36 stitches

The mouth and nostrils were free-form using slip stitch surface crochet, with stitches visible on the inside of the hat. The eyes were sewn through only the front stitch, so those stitches aren't visible on the inside. 

Saturday, October 15, 2011

Baby elf hat with tail

Crocheted baby elf hat with tail, with swirling colors. Don't mind the yarn strands hanging off the tail, I haven't bothered to tuck in the ends yet! I was thinking of attaching a pom-pom to the end, but I'm still deciding...

Materials:
Red Heart SuperSaver (100% acrylic yarn), Shocking Pink
Red Heart SuperSaver (100% acrylic yarn), Baby Pink
Red Heart SuperSaver (100% acrylic yarn), White

Pattern:
Start with a magic circle (with all 3 strands of yarn) with 3 double-crochet (DC) stitches of two colors and 2 DC's of the third color. To change colors, just pick up the next color strand and continue crocheting, so there is no need to tie off and tuck in ends. The entire hat was crocheted in the round, so there aren't any "rows" - which eliminates the need for slip stitches and chain stitches.

Once the tail is sufficiently long, increase by 2 stitches each round (2 DC in one space, 3 DC, 2 DC in one space, 4 DC), and continue increasing by 2 stitches with each subsequent round (next round would have 2 DC in one space, 4 DC, 2 DC in one space, 5 DC, etc), with each increase being in the space between the increase from the previous round, until the hat is big enough to fit. Then, to end each color, 2 half-double crochet (HDC), 2 single crochet, and 1 slip stitch before tying off.

To create the ribbing, DC in each space, join round with slip stitch, then chain 2. For the next row, alternate stitches between front post & back post DC, joining each round with slip stitch and chain 2 for next round. Repeat two more times.